Useful Tips to Port iPhone-Applications to iPad
- Best Practices
Several days ago we had a task to port a small iPhone app to the iPad. At the outset, the process seems pretty straightforward. However, as we got into the process we discovered this was not so. Through our efforts to make the app work on the iPad we discovered several iPhone and iPad programming techniques we would like to share. This article covers basic iPhone to iPad porting techniques and also we have supplemented it with our own practical recommendations and additional helpful remarks.
Tip 1 – nib-files
Follow Apples advice and begin porting your application with «Upgrade Current Target for iPad» menu item. It is easily found in the context menu (use right-click button of your mouse) of the current Target in XCode. Thus, all your nib-files of user interface will be duplicated in «Resources-iPad» folder and «-iPad» postfix will be added to the name of each file.
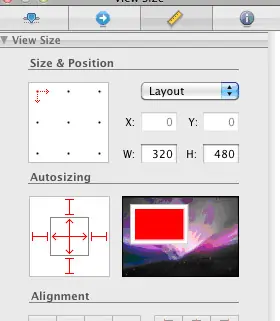
The next step is to process of your newly-created files. They should look pretty good on the spacious XGA display of Apples plane table computer. Here, you have two options at this stage. The first one is to open each nib-file in «Interface Builder» and select «Create iPad Version» item in the «File» menu. Using this method we always achieve the desired results. Nevertheless, there is another approach. You can also specify the attributes in each of nib-files using the way shown in the picture:
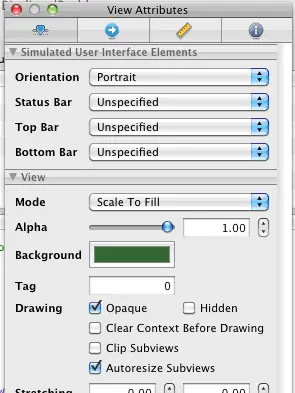
Here, special attention should be focused on the «Autoresize Subviews» tick box. As you can conclude from the name, in the given example, i.e. UI (View) element, it is responsible for automatic size change of all child elements. This option will allow you to modify the size of all elements in the hierarchy only by changing the size of element (View) at the highest level.
In addition, it is recommended to check the size adjustment and placement of your views immediately. It should be pointed out that you worked with 320×480 screens earlier. So, most likely these parameters will be set incorrectly.
Tip 2 – controller classes
Most likely you will have to change the size of the user interface elements in the controller classes dynamically. The following construction of conditional compilation should be helpful:
#if __IPHONE_OS_VERSION_MAX_ALLOWED >= __IPHONE_3_2
 //Here we put the code that is specific for iPad
 #else
 // Here we put the code for iPhone OS versions less than 3.2
 #endif
It is quite obvious that by checking the value of this property one can easily understand what type of interface iPad or iPhone should be used on a certain device.
Tip 3 – Targets
Apps can be designed for the iPhone or iPad or you can also select both devices. This setting can be specified in the Info.plist file, but it is recommended to inform the compiler about your choice. You can do this by selecting «Build» tab in the project properties and «Targeted Device Family» item. Specify «iPhone Device 3.2» in «Base SDK» item even if you wish to support only iPad. Of course, it sounds a little bit strange (iPhone still have iPhone OS 3.1.3 version), but it is exactly the item that you need.
There is another option, the «iPhone OS Deployment Target» that allows to differentiate devices, on which the work of application is planned. OS 3.2 version should be specified for supporting iPad only and OS 3.1.3 version is used both for iPhone and iPad.
Tip 4 – Submit
You may be faced with a few error messages when submitting your app to the AppStore. Please take a look at the problem descriptions below:
The binary you uploaded was invalid. The bundle did not contain an icon for iPhone and iPod of exactly 57×57 pixels, in .png format.
iTunes Connect will inform you about the lack of a 72×72 icon specially required for the iPad. The point is that you have to provide two icons now for both devices. Due to the fact that Xcode copies all bundle resources to the same root, the names of these two resources (icons for iPhone and iPad) should be different. We would recommend you to name the icon for a plane table by analogy with other resources i.e. «icon-iPad.png». After this you will have to specify the file name of a larger icon in Info.plist file.
Thus, in our case it will be «icon-iPad.png».
The binary you uploaded was invalid. The bundle identifier is already in use by a different software package.
Remember, that even if the application that is being ported from the iPhone, you should change the bundle identifier to avoid conflicts of names with the current iPhone application.
Your binary indicates support for iPhone/iPod touch. You must provide an iPhone/iPod touch screenshot.
It should be noted that this error often appears when downloading applications ticked as «iPad-only». Probably, the answer is that the setting of «Target device» in Info.plist file was checked incorrectly. Most likely this bug has already been fixed.
Tip 5 – Screenshots
Of course dont forget to add screenshots of the new version of the application that supports Apples Pad. Once your application is successfully downloaded, iTunes Connect will send you a notification. Remember, that screenshots have to be added for each localization!
Tip 6 – Screenshots
Here, we mean UI orientation depending on the placement of a device portrait or landscape. The point is that after the iPad came out Apple toughened the requirements for correspondence to its ecommendations (iPad Human Interface Guidelines). As a result, if, for example, if you decide to update your application and do not take into account its work in all possible orientations Apple will advise you to add that option.
Conclusion
We hope that the iPhone to iPad porting recommendations provided above will help save you some time.
Based on original article by Alexey Starovoitov.
Net-Craft.com builds mobile websites and iPhone, iPad, Android apps. Please contact us if you would like to learn more.